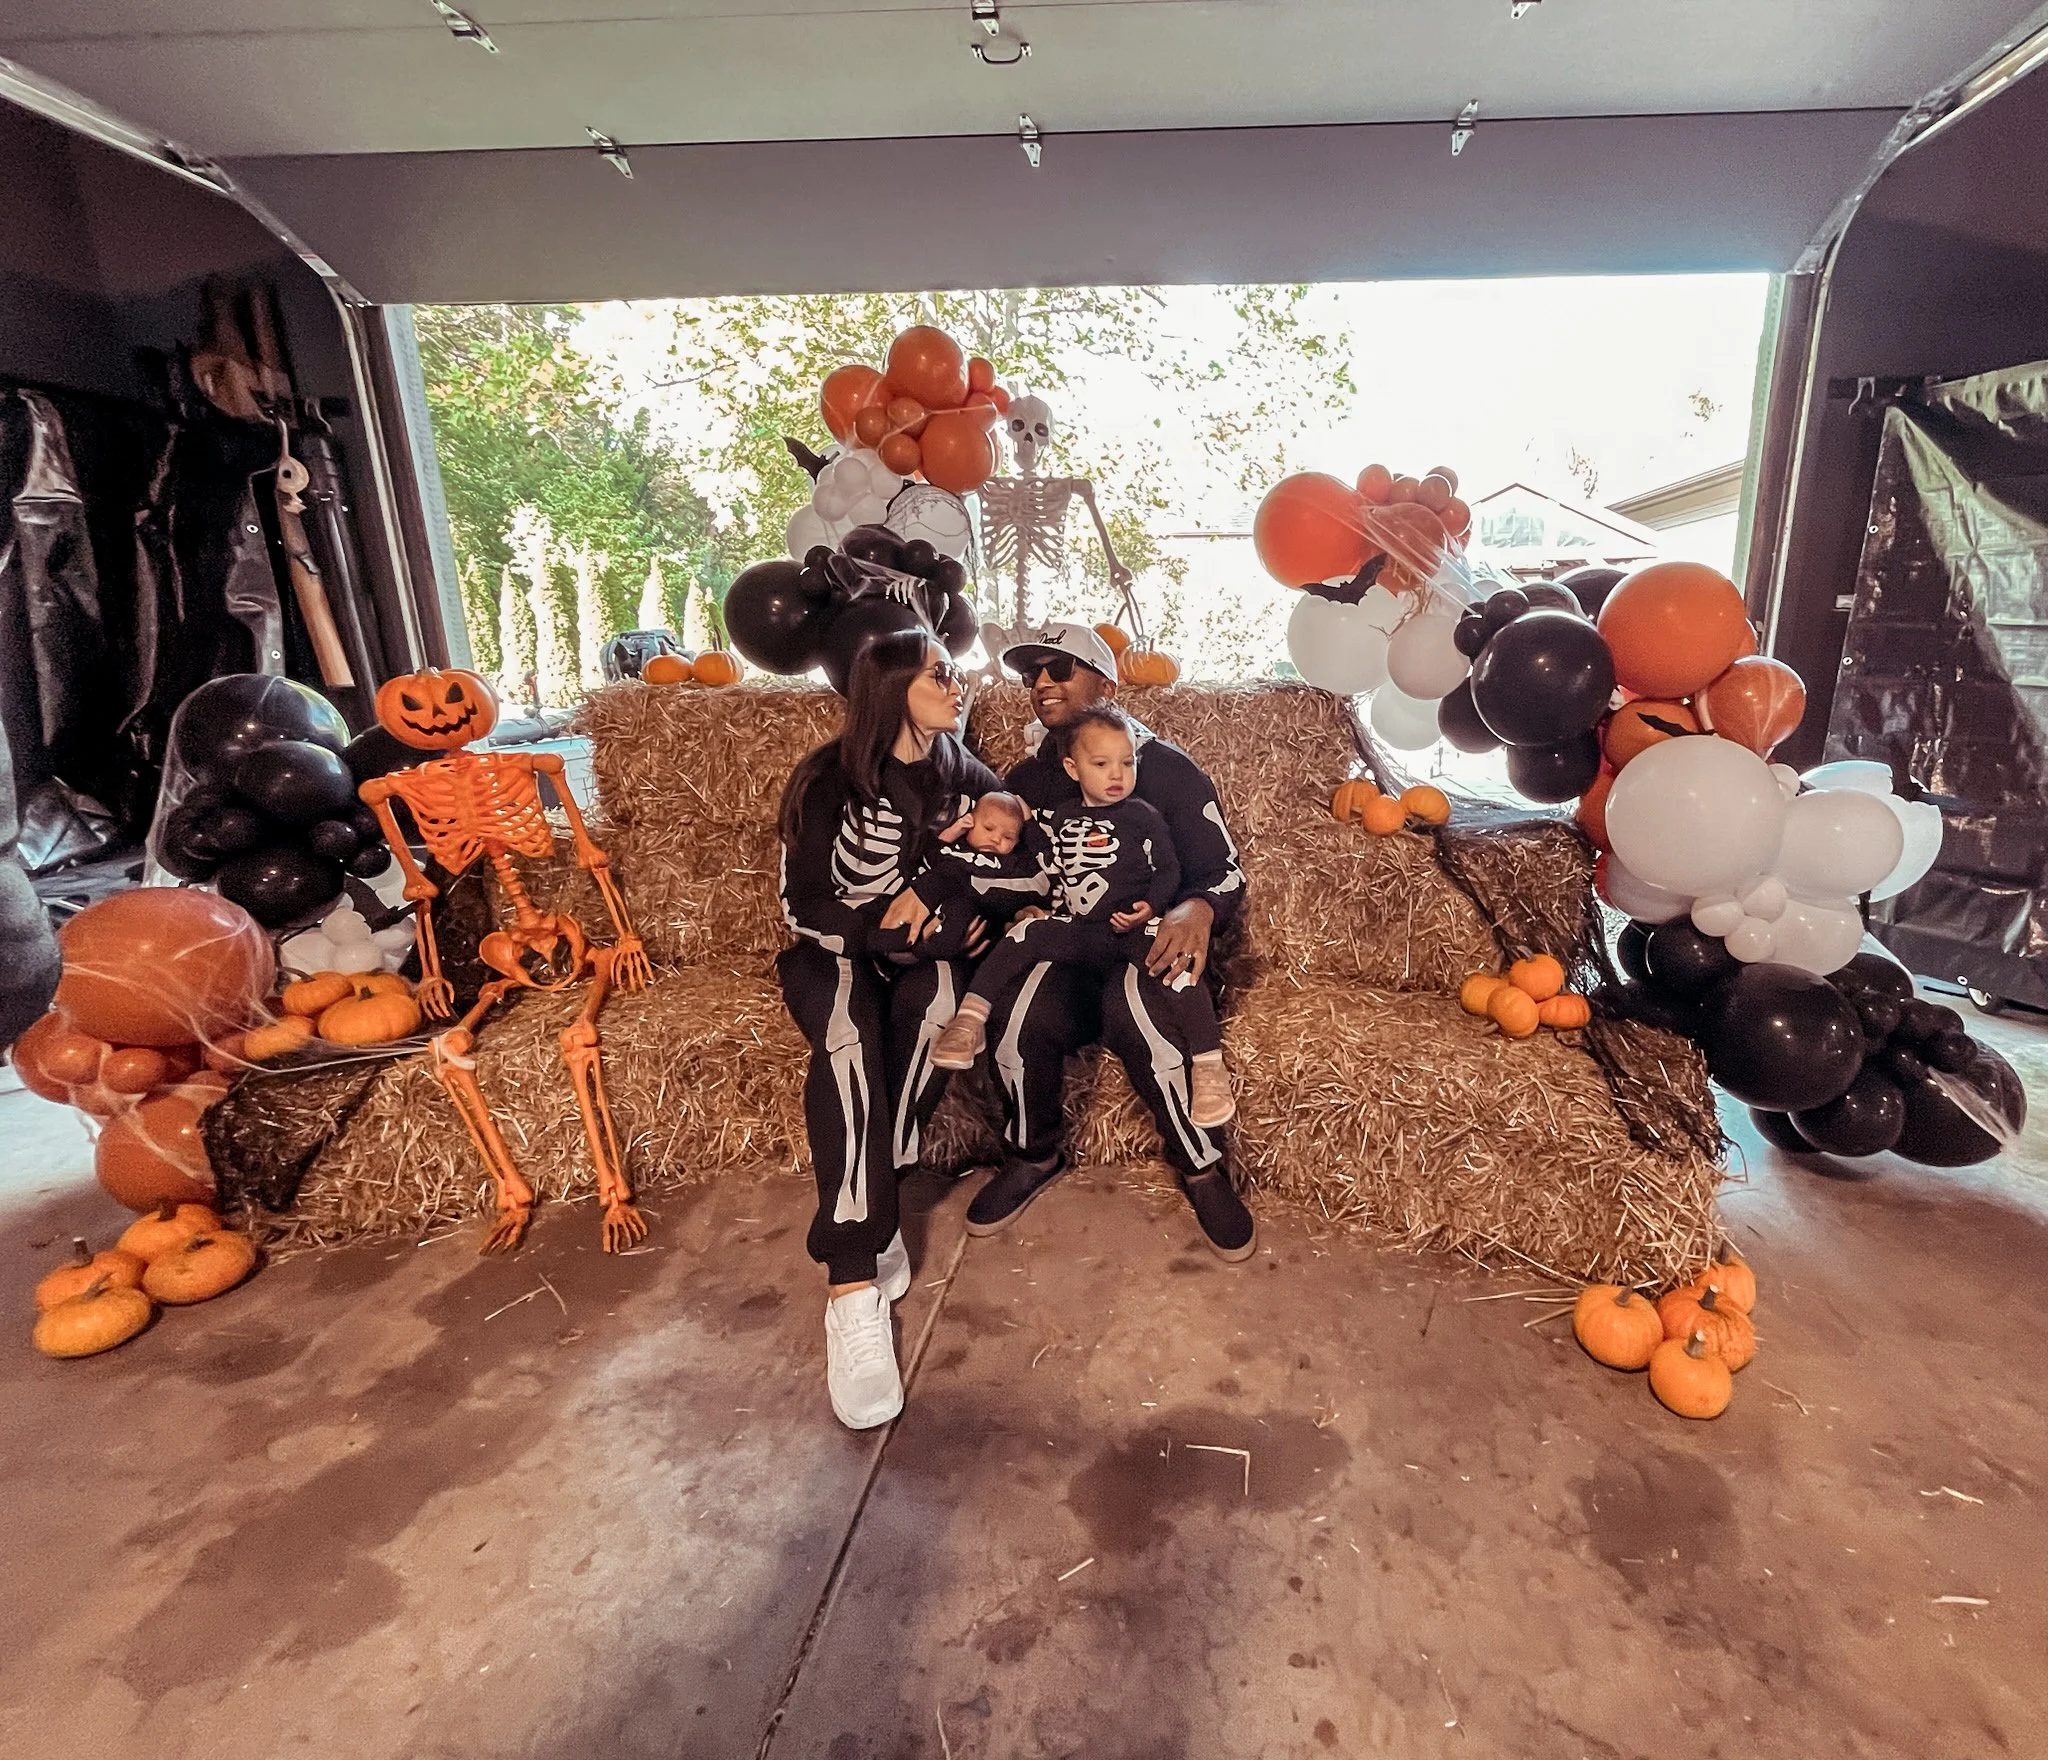
When I was pregnant with Margaux, I realized that Charlie's second birthday was just two weeks after I was expected to deliver. Charlie had recently become the world's biggest fan of birthday parties, and the birthday song in particular, so I knew there was no way in hell we were going to miss celebrating our little girl.
I also knew I would probably be in diapers myself for four to six weeks after delivery, absolutely sleep-deprived for at least eight, and then, you know, navigating life with two children for the rest of my maternity leave while trying to figure it all out. So I had a choice:
I could take on the entire mental and physical load of planning a great birthday party for a two-year-old, or I could outsource it to someone I trusted, someone who would care just as much as I did about all the little details that make a gathering feel special. And that is when I decided to hire a party planner.
What I learned from that experience completely changed the way I plan parties. I now have a system I use for every gathering, one that helps me stay organized, work ahead, manage the budget, and actually enjoy the celebration when it arrives. Since I had to pay someone to teach me this system, I thought the least I could do was share the wealth with you.
In this article, I am breaking down every part of my party-planning process, plus sharing the exact template I now use to keep the vision, timeline, guest list, budget, purchases, and to-dos in one place. Because the goal is not to throw the most elaborate party. The goal is to create a few thoughtful opportunities for people to connect, then build a plan that lets you be present enough to enjoy them.
Step One: Start With a Central Concept
First things first, I needed a central concept for the party. I ended up diving all the way into the deep end with a theme, but I do not think every party needs to be themed within an inch of its life. What every party does need is one clear idea that helps the rest of the decisions make sense. Charlie's birthday was going to be right around Halloween, and I thought it would be the perfect opportunity to let families get a second wear out of their kiddos' Halloween costumes.
The concept became: Our Little Boo Is Two.
Once I had the theme, I needed one central activity that would bring a yard full of two-year-olds together for a little bit of organized fun. I decided to invent a game called Ghost in the Graveyard. I bought a bunch of spooky Styrofoam tombstones from Lowe's and set them up around the backyard. Then I found white, ghost-shaped Easter eggs with little faces on them and filled each one with Halloween creature toys and candy. The kids would hunt through the graveyard for ghosts.
Theme: dialed in. Central activity: dialed in.
Those two decisions gave me the makings of a really good party. More importantly, they gave us a filter for everything else. Now I could ask a planner to help wrap the full guest experience around that central idea, including the decor, food, favors, crafts, and flow of the day.
Step Two: Be Honest About What the Party Needs to Do
We had not done anything particularly impressive for Charlie's first birthday. We had recently had a baby and moved into a new house, which meant this party was quietly going to serve a few purposes at once.
It was a bit of a housewarming. It was a chance for grandparents, aunts, uncles, cousins, and friends to meet the new baby. Most importantly, it was an opportunity to celebrate our Charlie girl with all her daycare and neighborhood friends.
That is a lot of different people, ages, and expectations to hold inside one afternoon.
I needed help thinking through the details, the timeline, and the guest experience. I did not simply need someone to buy balloons. I needed someone to help carry the thinking.
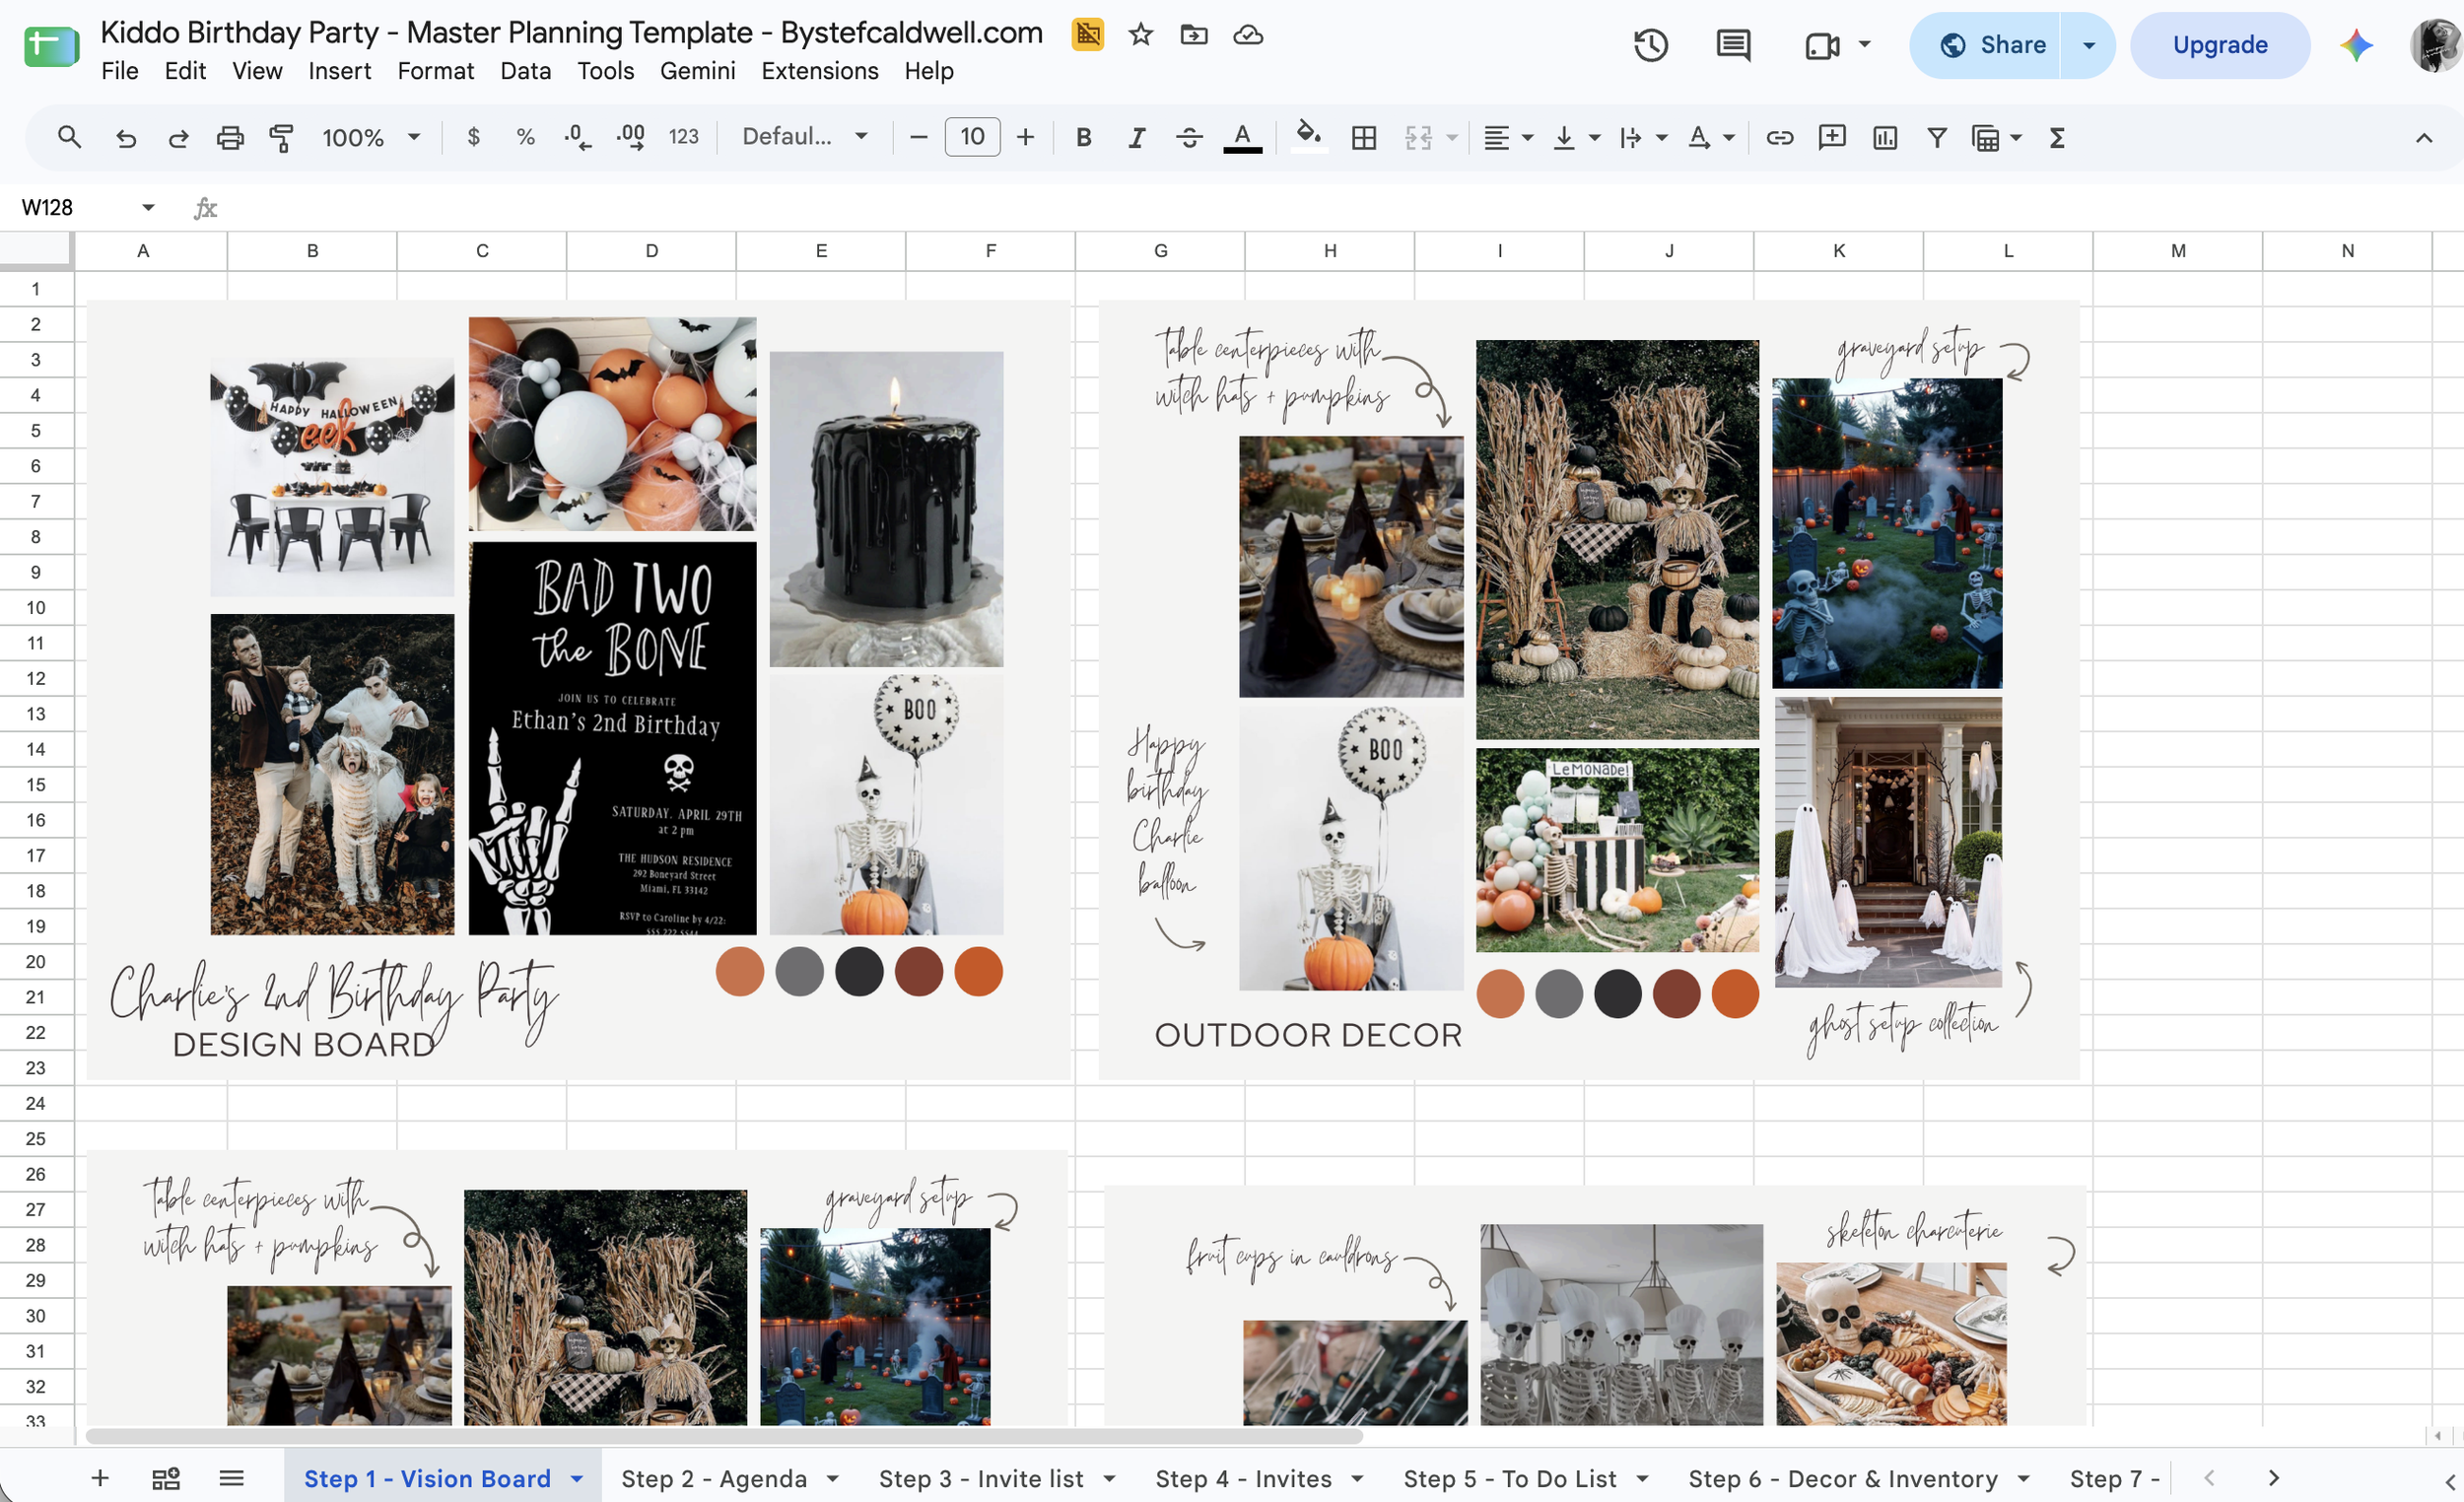
Step Three: Build a Vision Board
Enter Alex McCarron into the group chat. I found Alex through a party-planning network. She was brilliant and in the process of building her event-planning business in Chicago. She planned weddings and birthday parties, and because she was still growing her book of business, she was incredibly cost-effective. She was like my very own Mindy Weiss.
After a discovery call, we realized that if I wanted to truly outsource the vision, we needed to get our brains operating on the same wavelength. So step one for us was a vision board. I gave Alex the full verbal download of my ideas, and off she went.
The vision board delivered.
It helped us see all the fun ways the theme could show up from the moment guests arrived until the moment they left. We used witch hats as decor, skeletons to welcome guests, and a little decorated arrival table where my mom, dressed as a witch, served "vampire juice" out of a cauldron. It was amazing, but more importantly, it was cohesive. Every detail felt like it belonged to the same story. The vision board also helped us decide where to spend, where to simplify, and which ideas were cute but completely unnecessary.
Step Four: Create More Than One Way to Connect
At this stage, we decided to add an asynchronous craft for families to do whenever it worked for them. We set up several kid-height tables with mini pumpkins and paint markers so every child could decorate a pumpkin and bring it home just in time for Halloween.
For the goodie bags, I skipped the traditional pile of pre-stuffed favors. Instead, I gave each child a ghost bag containing a pair of sunglasses and a bubble wand right before Ghost in the Graveyard began. The bag doubled as the child's egg-hunt basket, and the treats and toys collected during the game became the rest of the favor. One bag. Two jobs. Less stuff for me to buy and assemble.
This brings me to one of the biggest lessons I have learned about hosting: a great party gives people a few different ways to create intentional connection. Not everyone walks into a party ready to mingle with a room full of people. Some guests need an easy entry point. Some kids need time to warm up. Some parents need somewhere to land before they decide what to do next. At Charlie's party, each part of the experience served a purpose:
The cauldron welcome ensured every guest was greeted by someone in our family, even if I was busy when they arrived. My mom could welcome them, orient them, and explain what we had planned.
The pumpkin table gave adults and kids a home base. They could sit down, start doing something with their hands, observe who else was there, and ease into the party.
Ghost in the Graveyard gave the day a shared anchor. It brought everyone together for one big moment of fun.
The birthday song and group photo gave us a natural finale before guests began leaving at their leisure.
You do not need seventeen activities. You need a warm welcome, something guests can opt into, and one central moment that brings everyone together.
Step Five: Map the Guest Experience in 15-Minute Increments
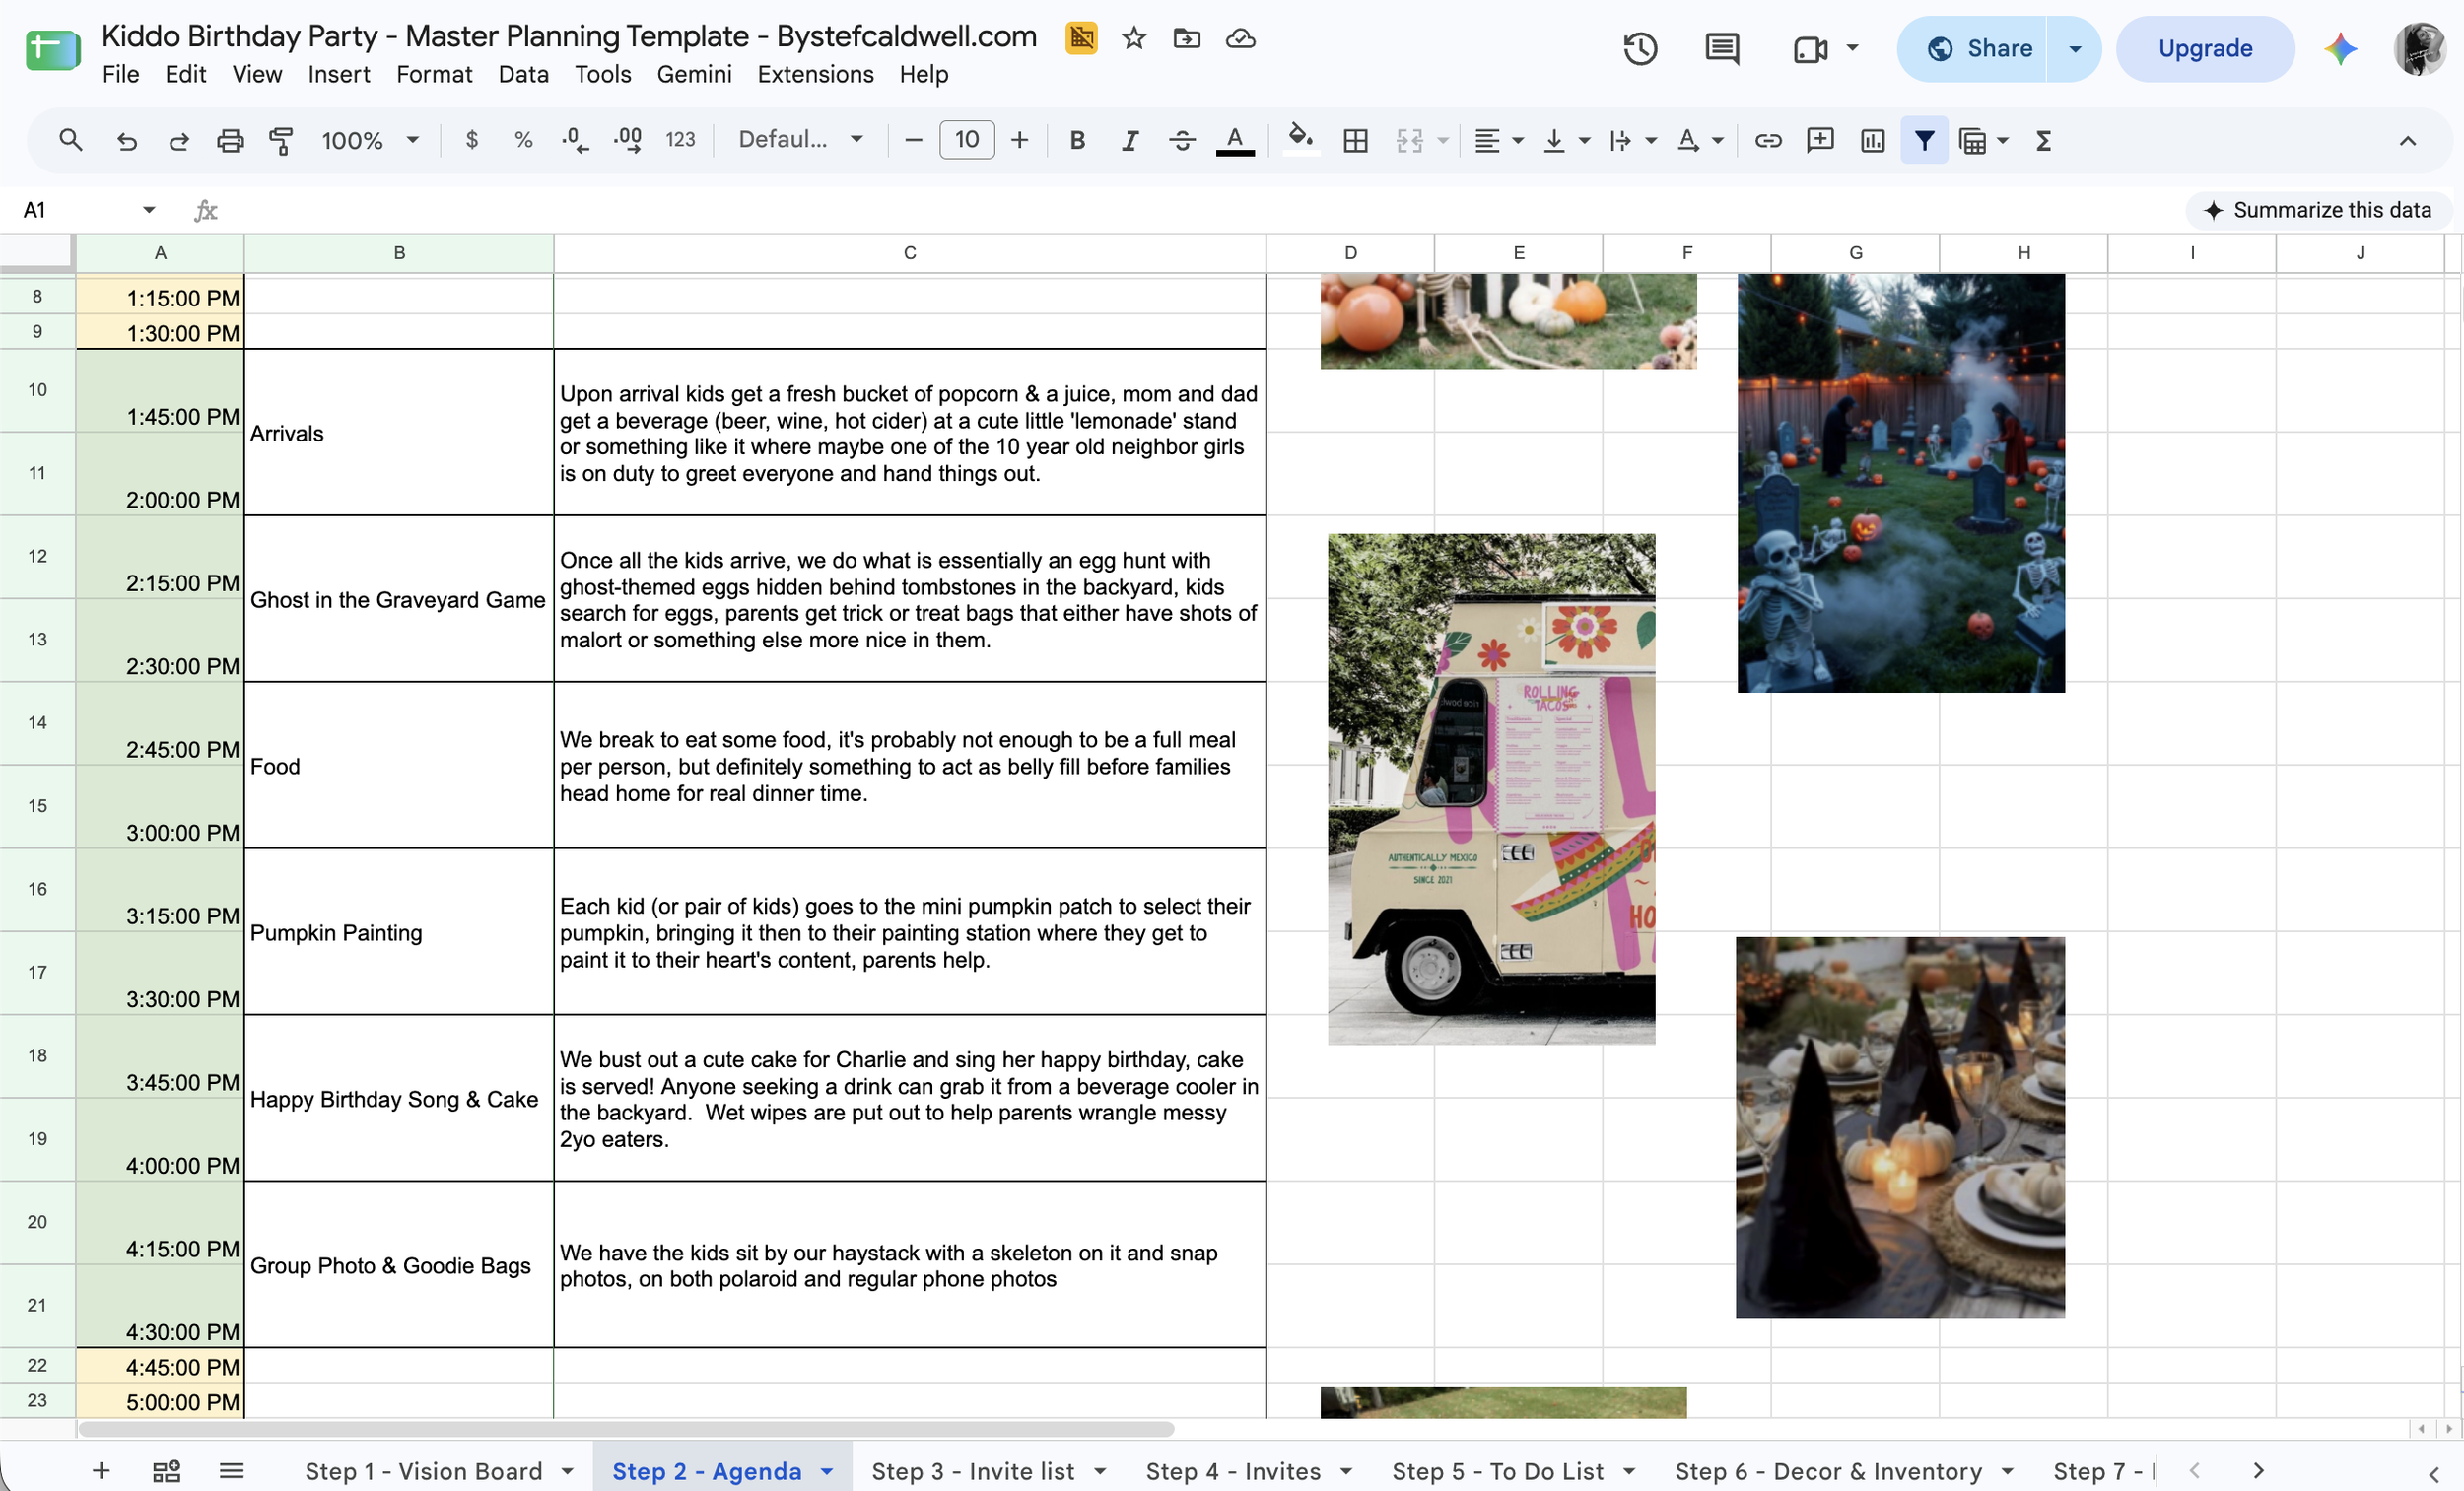
Once the vision board was ready and the ideas were flowing, we established the agenda for the day. Breaking a party into 15-minute increments sounds a little ridiculous until you do it. It forces you to see the day through your guests' eyes. It also helps you honor the start and end time you put on the invitation. Our guest-facing timeline looked something like this:
2:00 p.m.: Welcome
2:15 p.m.: Ghost in the Graveyard
2:45 p.m.: Let's eat
3:45 p.m.: Happy birthday song and group photo
4:00 p.m.: Goodbye
Once we had the party itself mapped out, we built the setup and teardown around it. That was the moment I realized how long party day would actually be. A party that starts at 2:00 p.m. does not begin at 2:00 p.m. It begins when you start cleaning, setting tables, accepting deliveries, filling coolers, hiding ghost eggs, and getting everyone dressed. For us, it began at 9:00 a.m.
Step Six: Let the Guest List Drive the Logistics
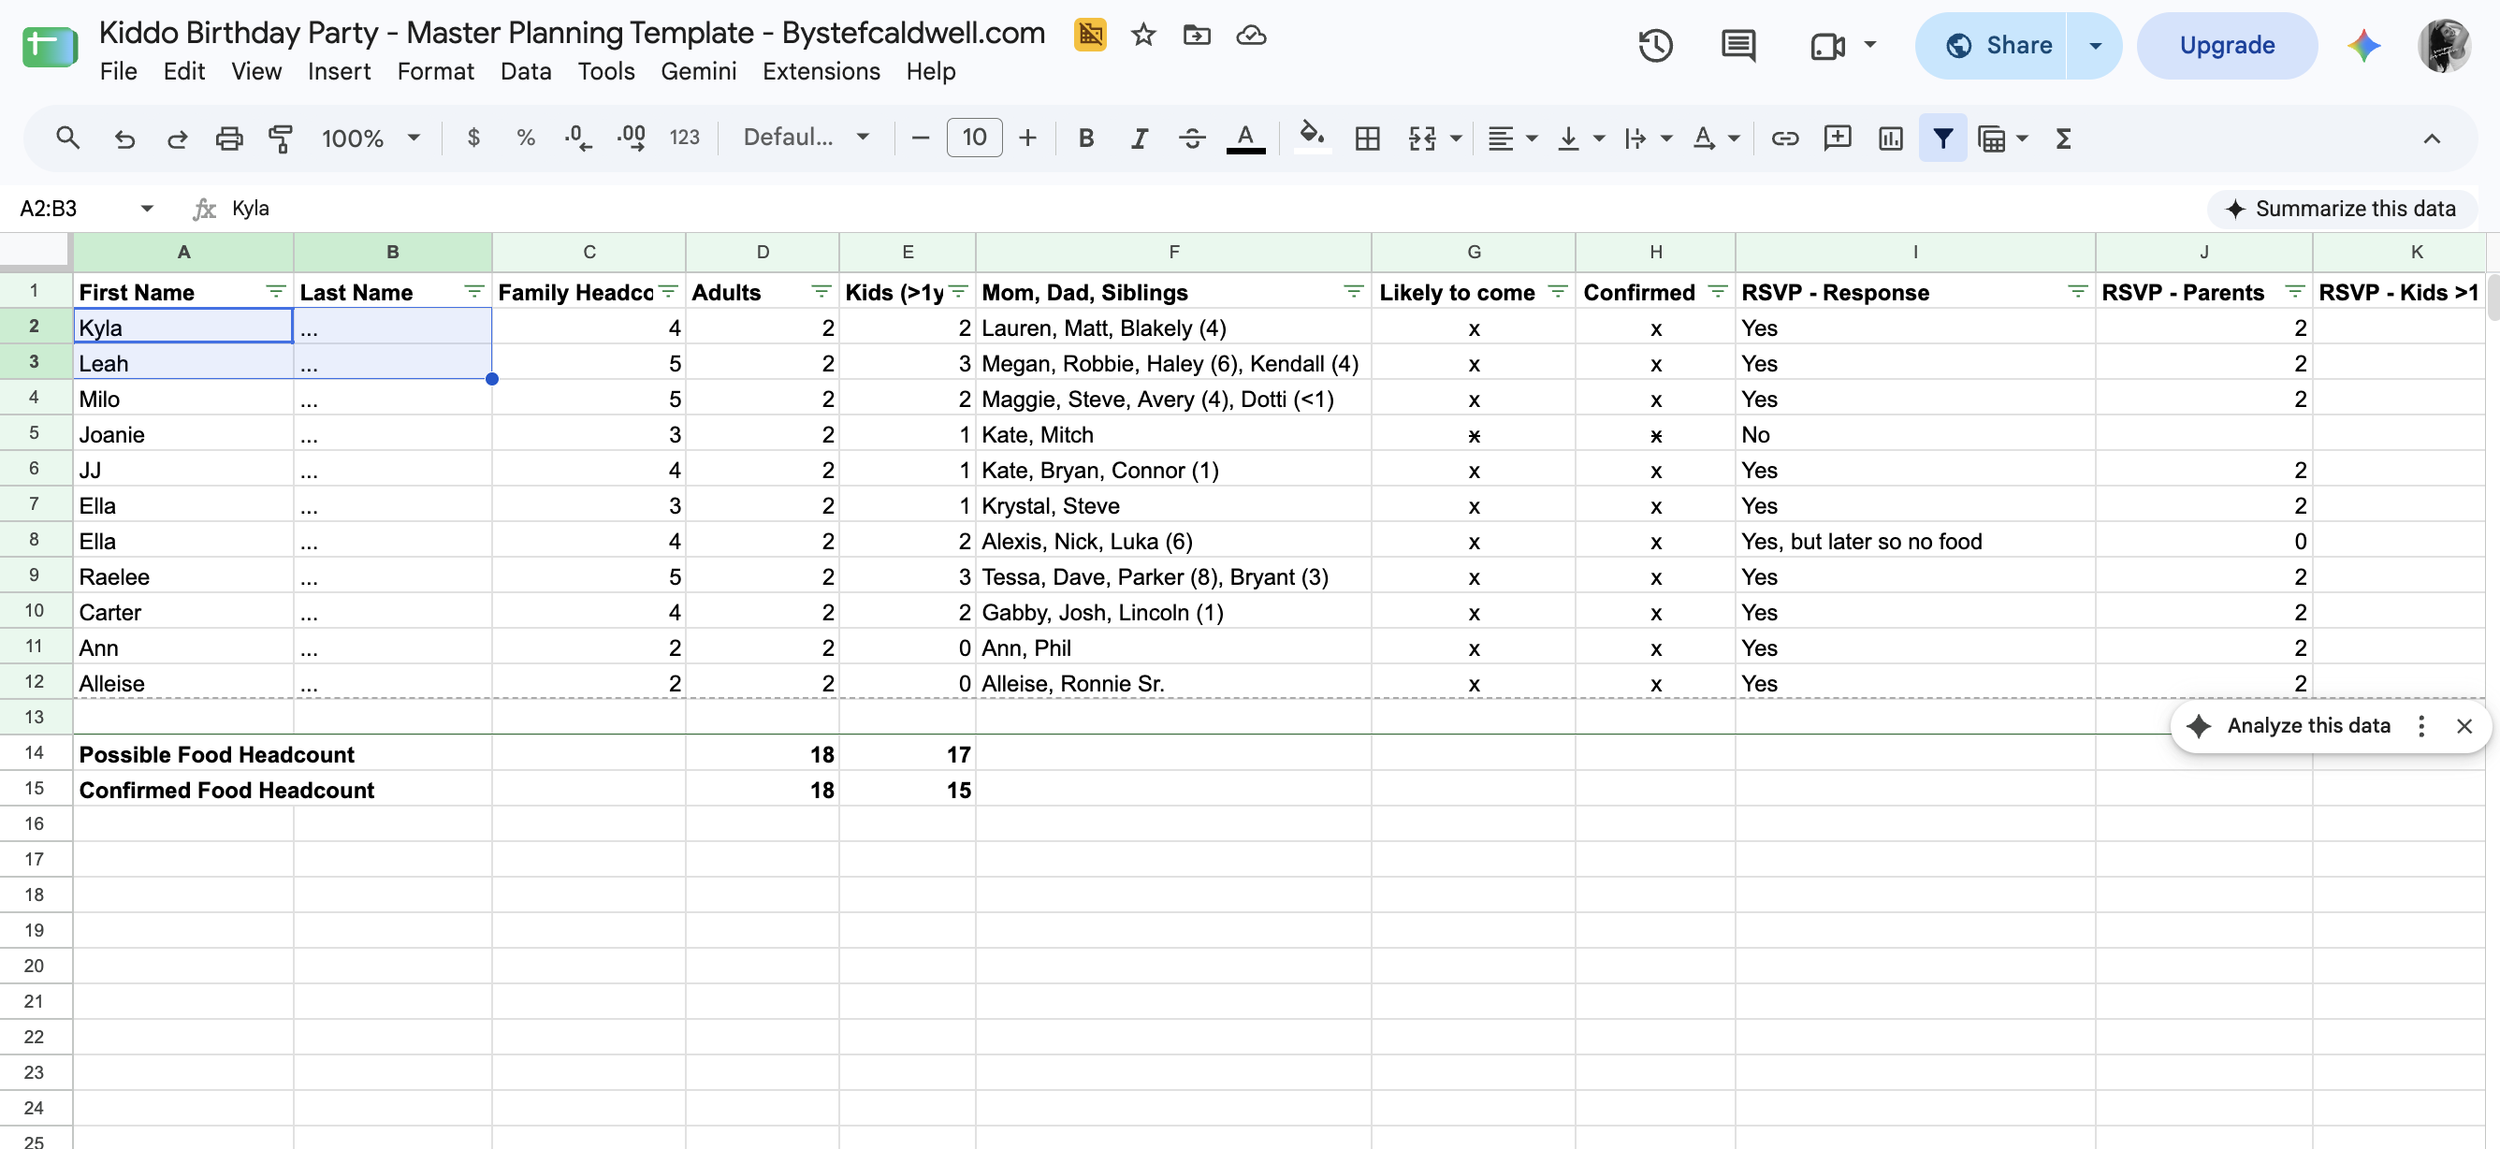
With the concept and timeline established, it was time to build the guest list. The guest list drives two of your biggest decisions: how people will sit and how people will eat. Both decisions are also shaped by whether the party is indoors or outdoors.
If you are hosting a small, intimate gathering, you may already own all the seating you need. You might be able to plan for the backyard and move everyone indoors if the weather turns.
If you are hosting a larger outdoor party, you need to think through tables, chairs, a possible tent, and your bad-weather backup. Can everyone actually fit inside? Do you want that many people moving through your home? What will happen to the floors, bathrooms, and flow of the space?
We ended up with about 90 guests. Ridiculous for a two-year-old, I know. In my defense, roughly 30 of them were children. Still, I was firmly postpartum and there was no way in hell I could feed that many people without help. I also wanted as little cleanup as possible.
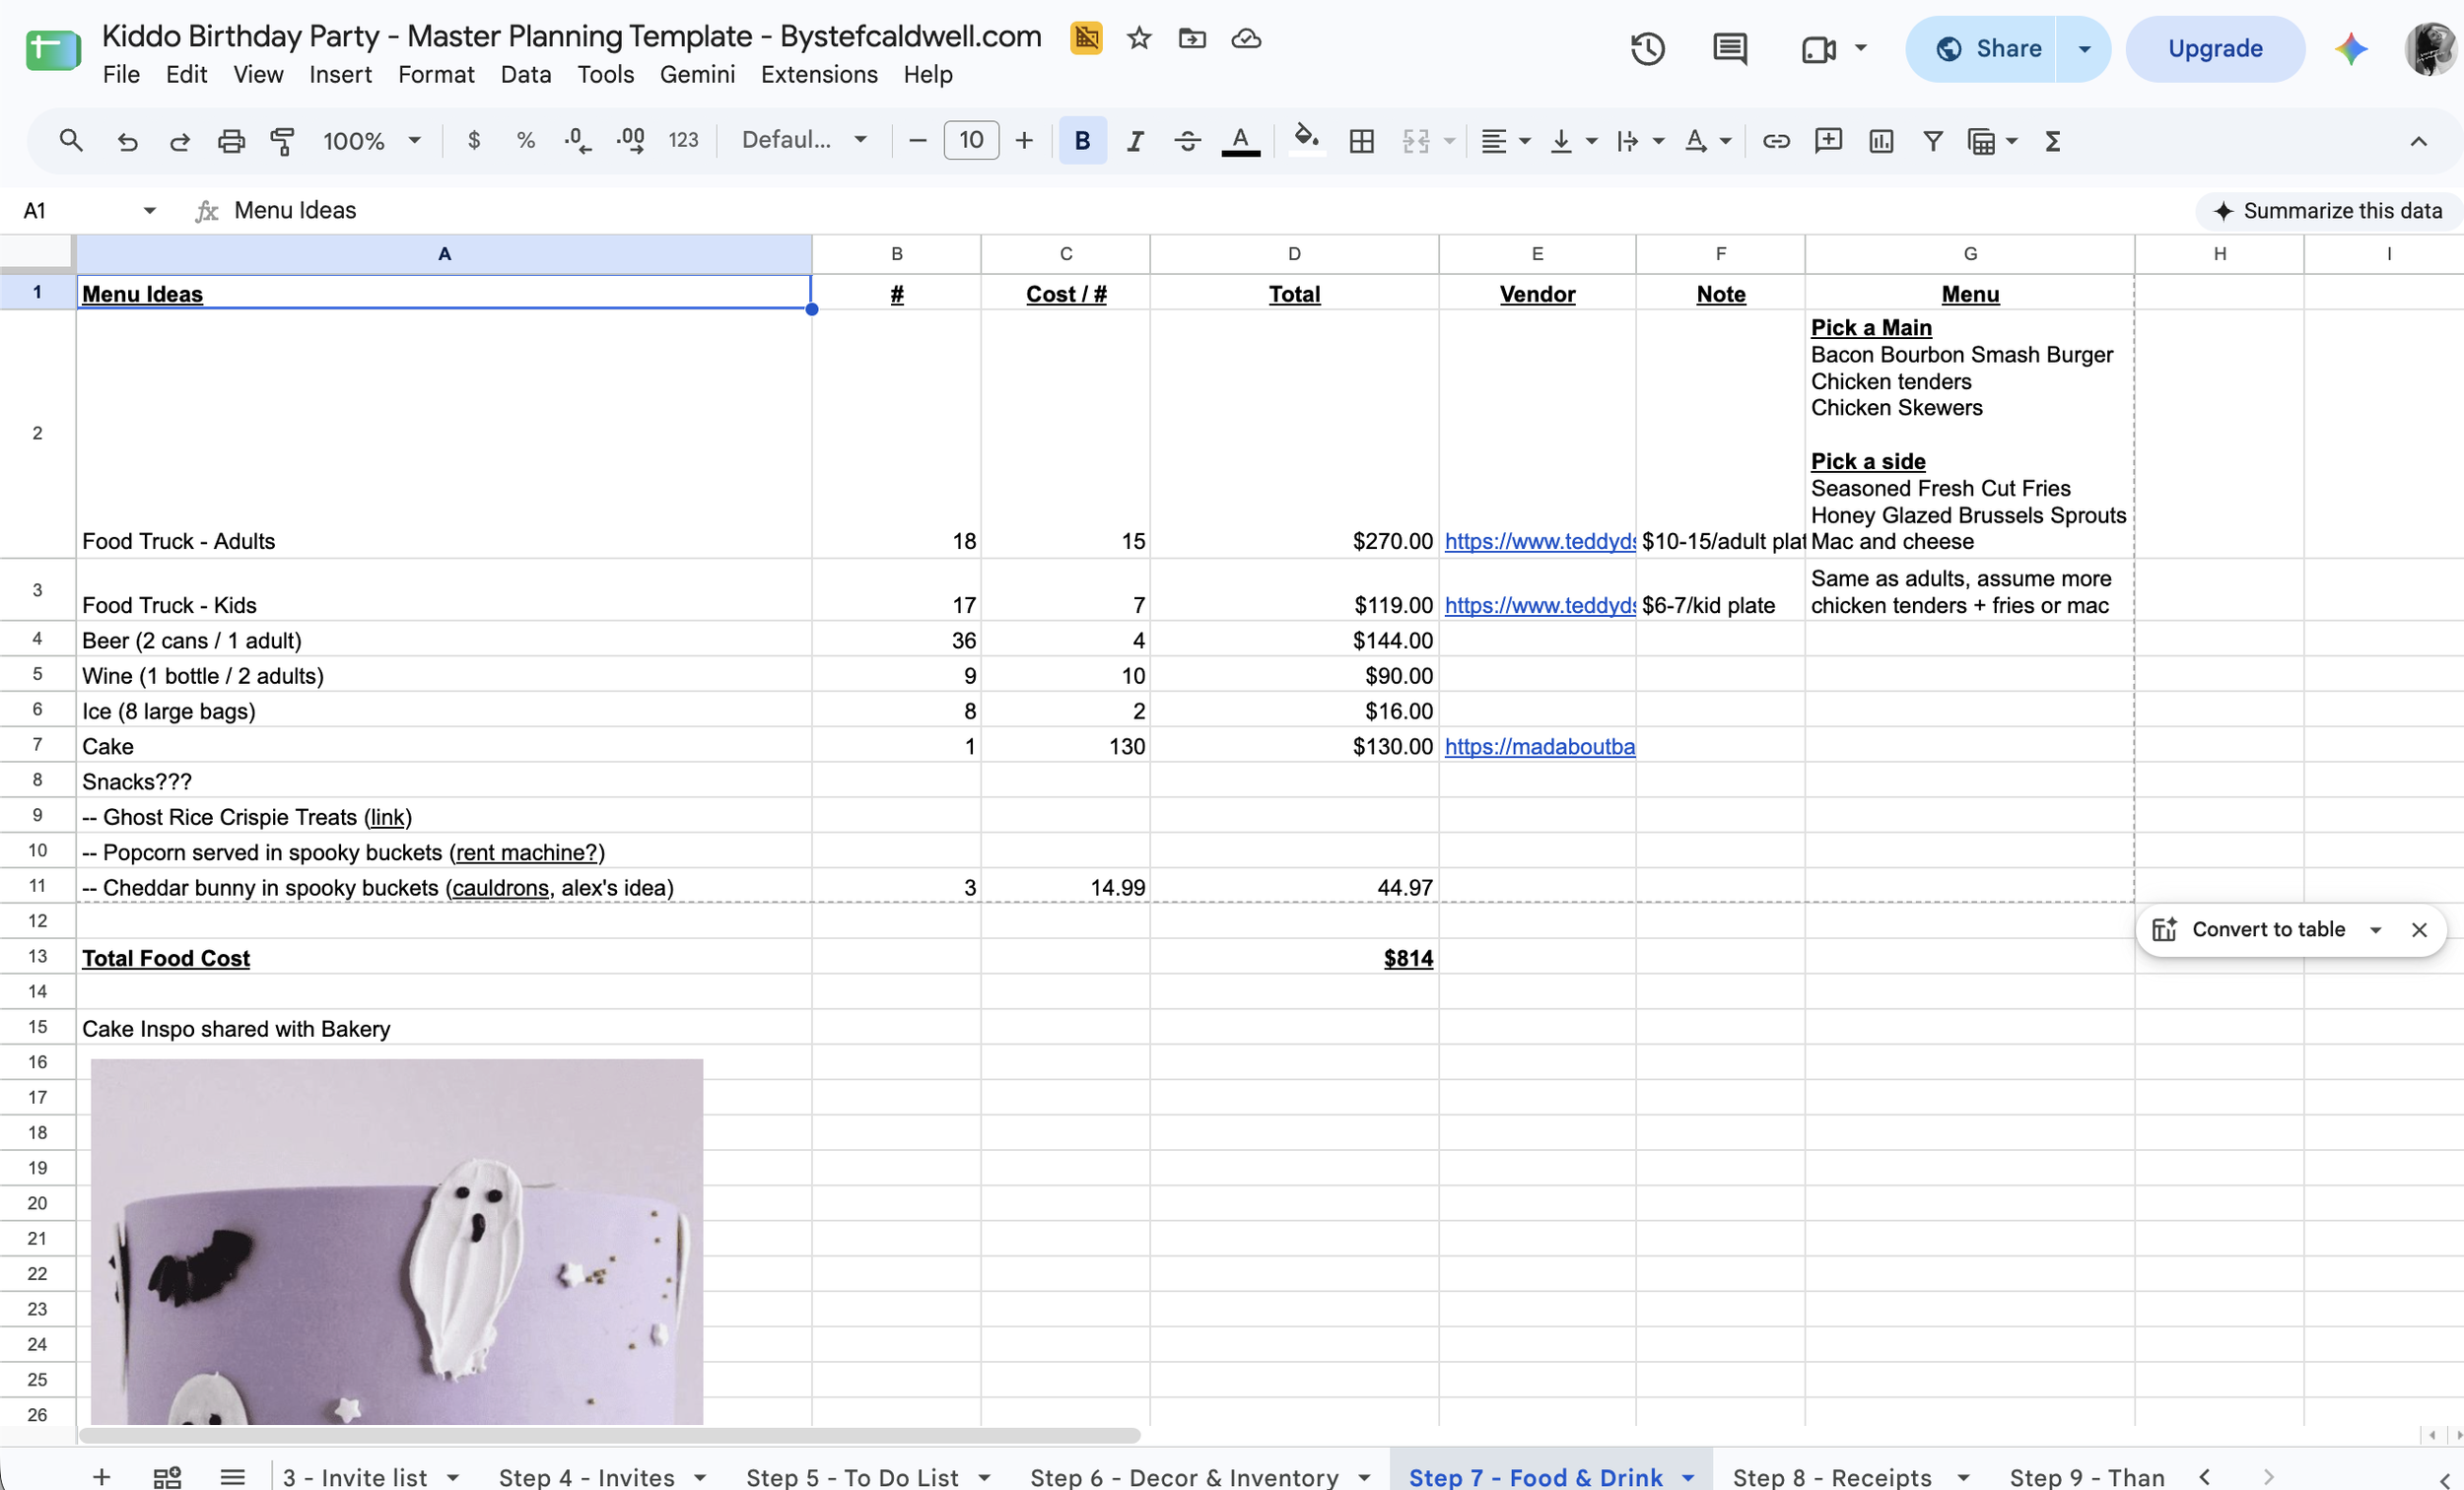
Step Seven: Choose Food That Reduces Your Workload
We opted for a food truck, and it was the perfect solution. The mess was self-contained, the food was cooked and served outside, and the truck even brought the plates, napkins, and silverware. The only disposables we had to deal with were the ones people actually ate from. We chose a menu that worked for both adults and kids: bourbon bacon cheeseburgers, fries, Brussels sprouts, chicken tenders, and macaroni and cheese.
As RSVPs came in, I tracked adults and children separately so I could give the food-truck team a meaningful estimate of what people would order.
Right before Ghost in the Graveyard, I gathered everyone for a quick welcome. I thanked them for coming, explained the game, and told them the food truck would open when the hunt ended. I also shared the assumptions we had used for ordering: approximately one burger meal per adult and one chicken-tender meal per child. This sounds overly specific, but it helped guests understand how to order and helped us stay within the quantities and budget we had planned with the vendor.
Whenever possible, choose food that removes jobs from your own list. The best menu is not just the one that tastes good. It is the one that can be served, eaten, and cleaned up without turning the host into a short-order cook.
Step Eight: Plan for Enough Seating, Not Perfect Seating
Alex had a helpful rule of thumb for a casual, open-house-style party: provide seats for roughly three-quarters of your guests. Not everyone will sit at the same time, especially when kids are running around and food is being served in waves. For our party, that meant we needed seating for about 60 people, or roughly eight tables with eight chairs each.
After pricing everything through a local rental company, we decided to buy folding tables and chairs on Amazon. It cost more upfront, but we could either spend the money once on a rental or invest in a setup we could reuse for Charlie's third, fourth, fifth, sixth, and seventh birthdays.
You get it.
Buying will not be the right answer for everyone. You need somewhere to store the equipment, and you need to believe you will use it again. But for the kind of home gatherings we wanted to continue hosting, it made sense.
Step Nine: Use the Invitation to Set Expectations
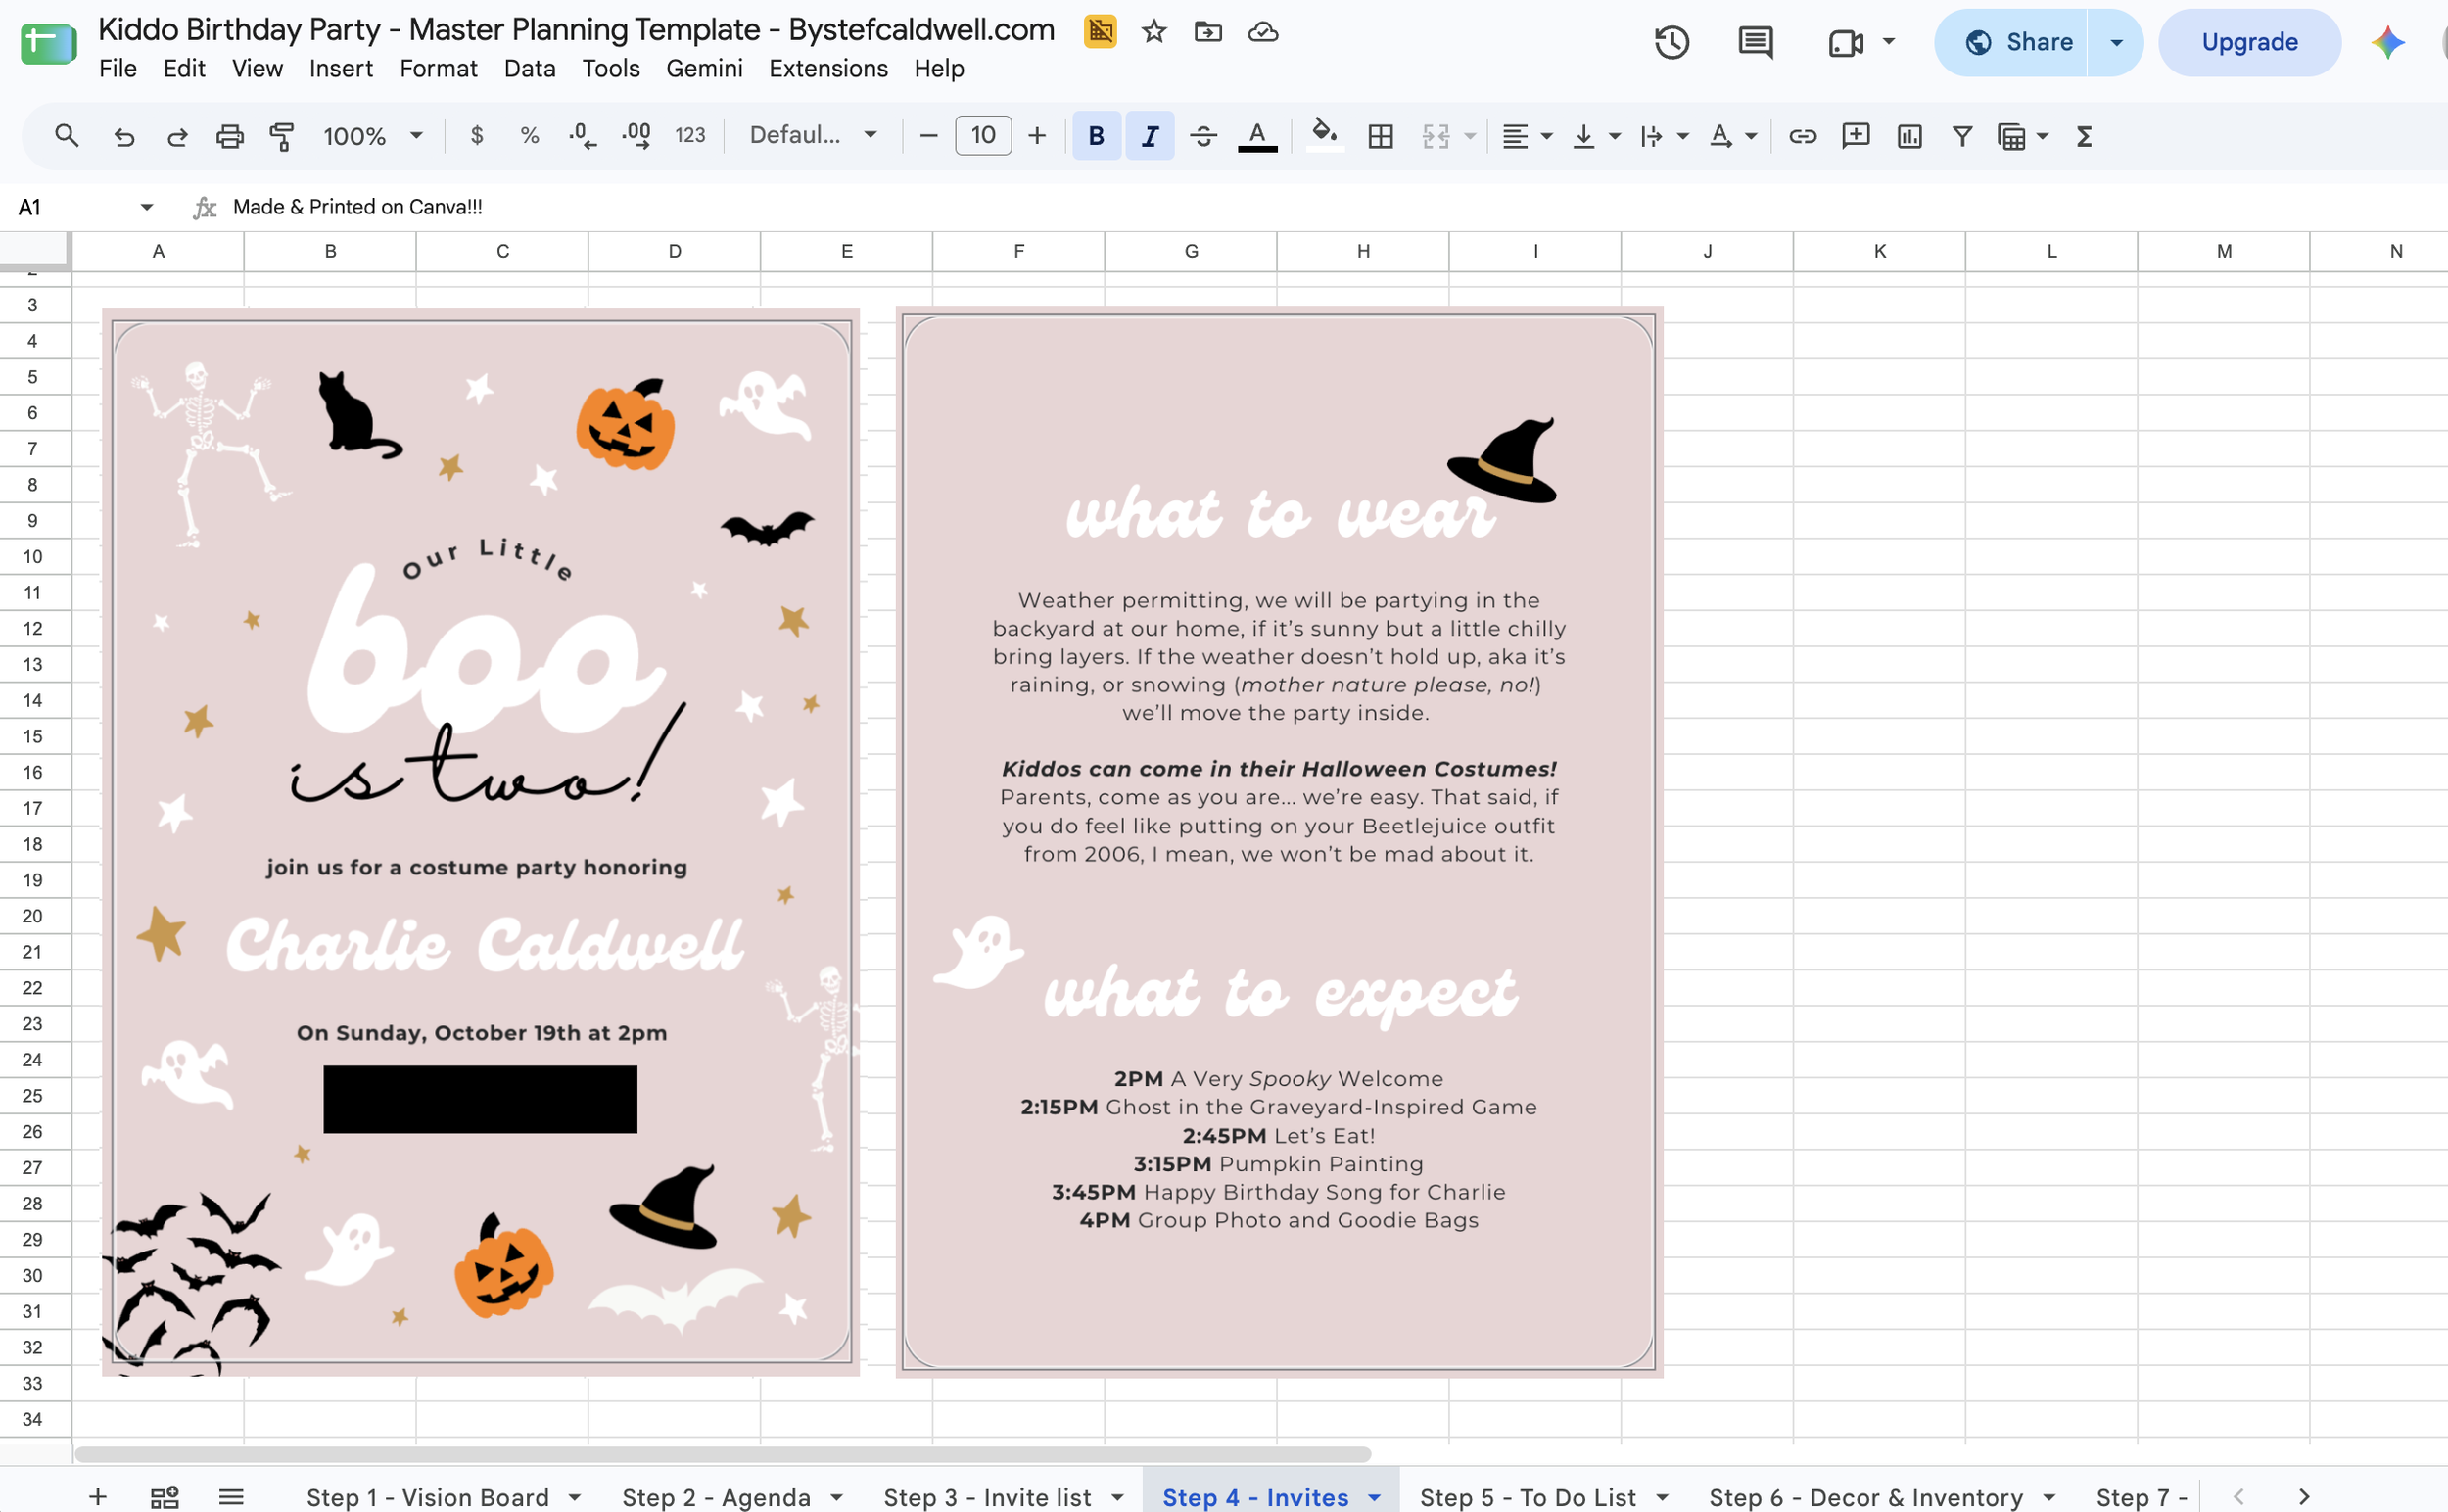
Once the guest list, food, and seating were decided, it was finally time to send invitations. I used Canva to design and ship them. I am a big fan of an IRL invitation. Nothing against an evite, but I think there is something special about creating an artifact you can hold onto after the fact.
The front carried our cutesy, spooky message: Our Little Boo Is Two! On the back, I included the party timeline. This helped families understand that the day had a real beginning and ending, and that the primary activity started shortly after arrival. In other words: do not be late, because your kid will miss the ghost hunt.
I also included important context about what to wear. It was an outdoor party, so families needed to dress accordingly. I made it clear that children were encouraged to wear Halloween costumes and adults were welcome to join in, but no one was required to dress up. So many adults arrived in wonderful costumes, but no one felt like they had to spend money or do extra work just to attend.
That is an important rule for themed parties: let people off the hook. You may love a theme. Not everyone will. Give your guests a way to participate without making the party feel like an assignment.
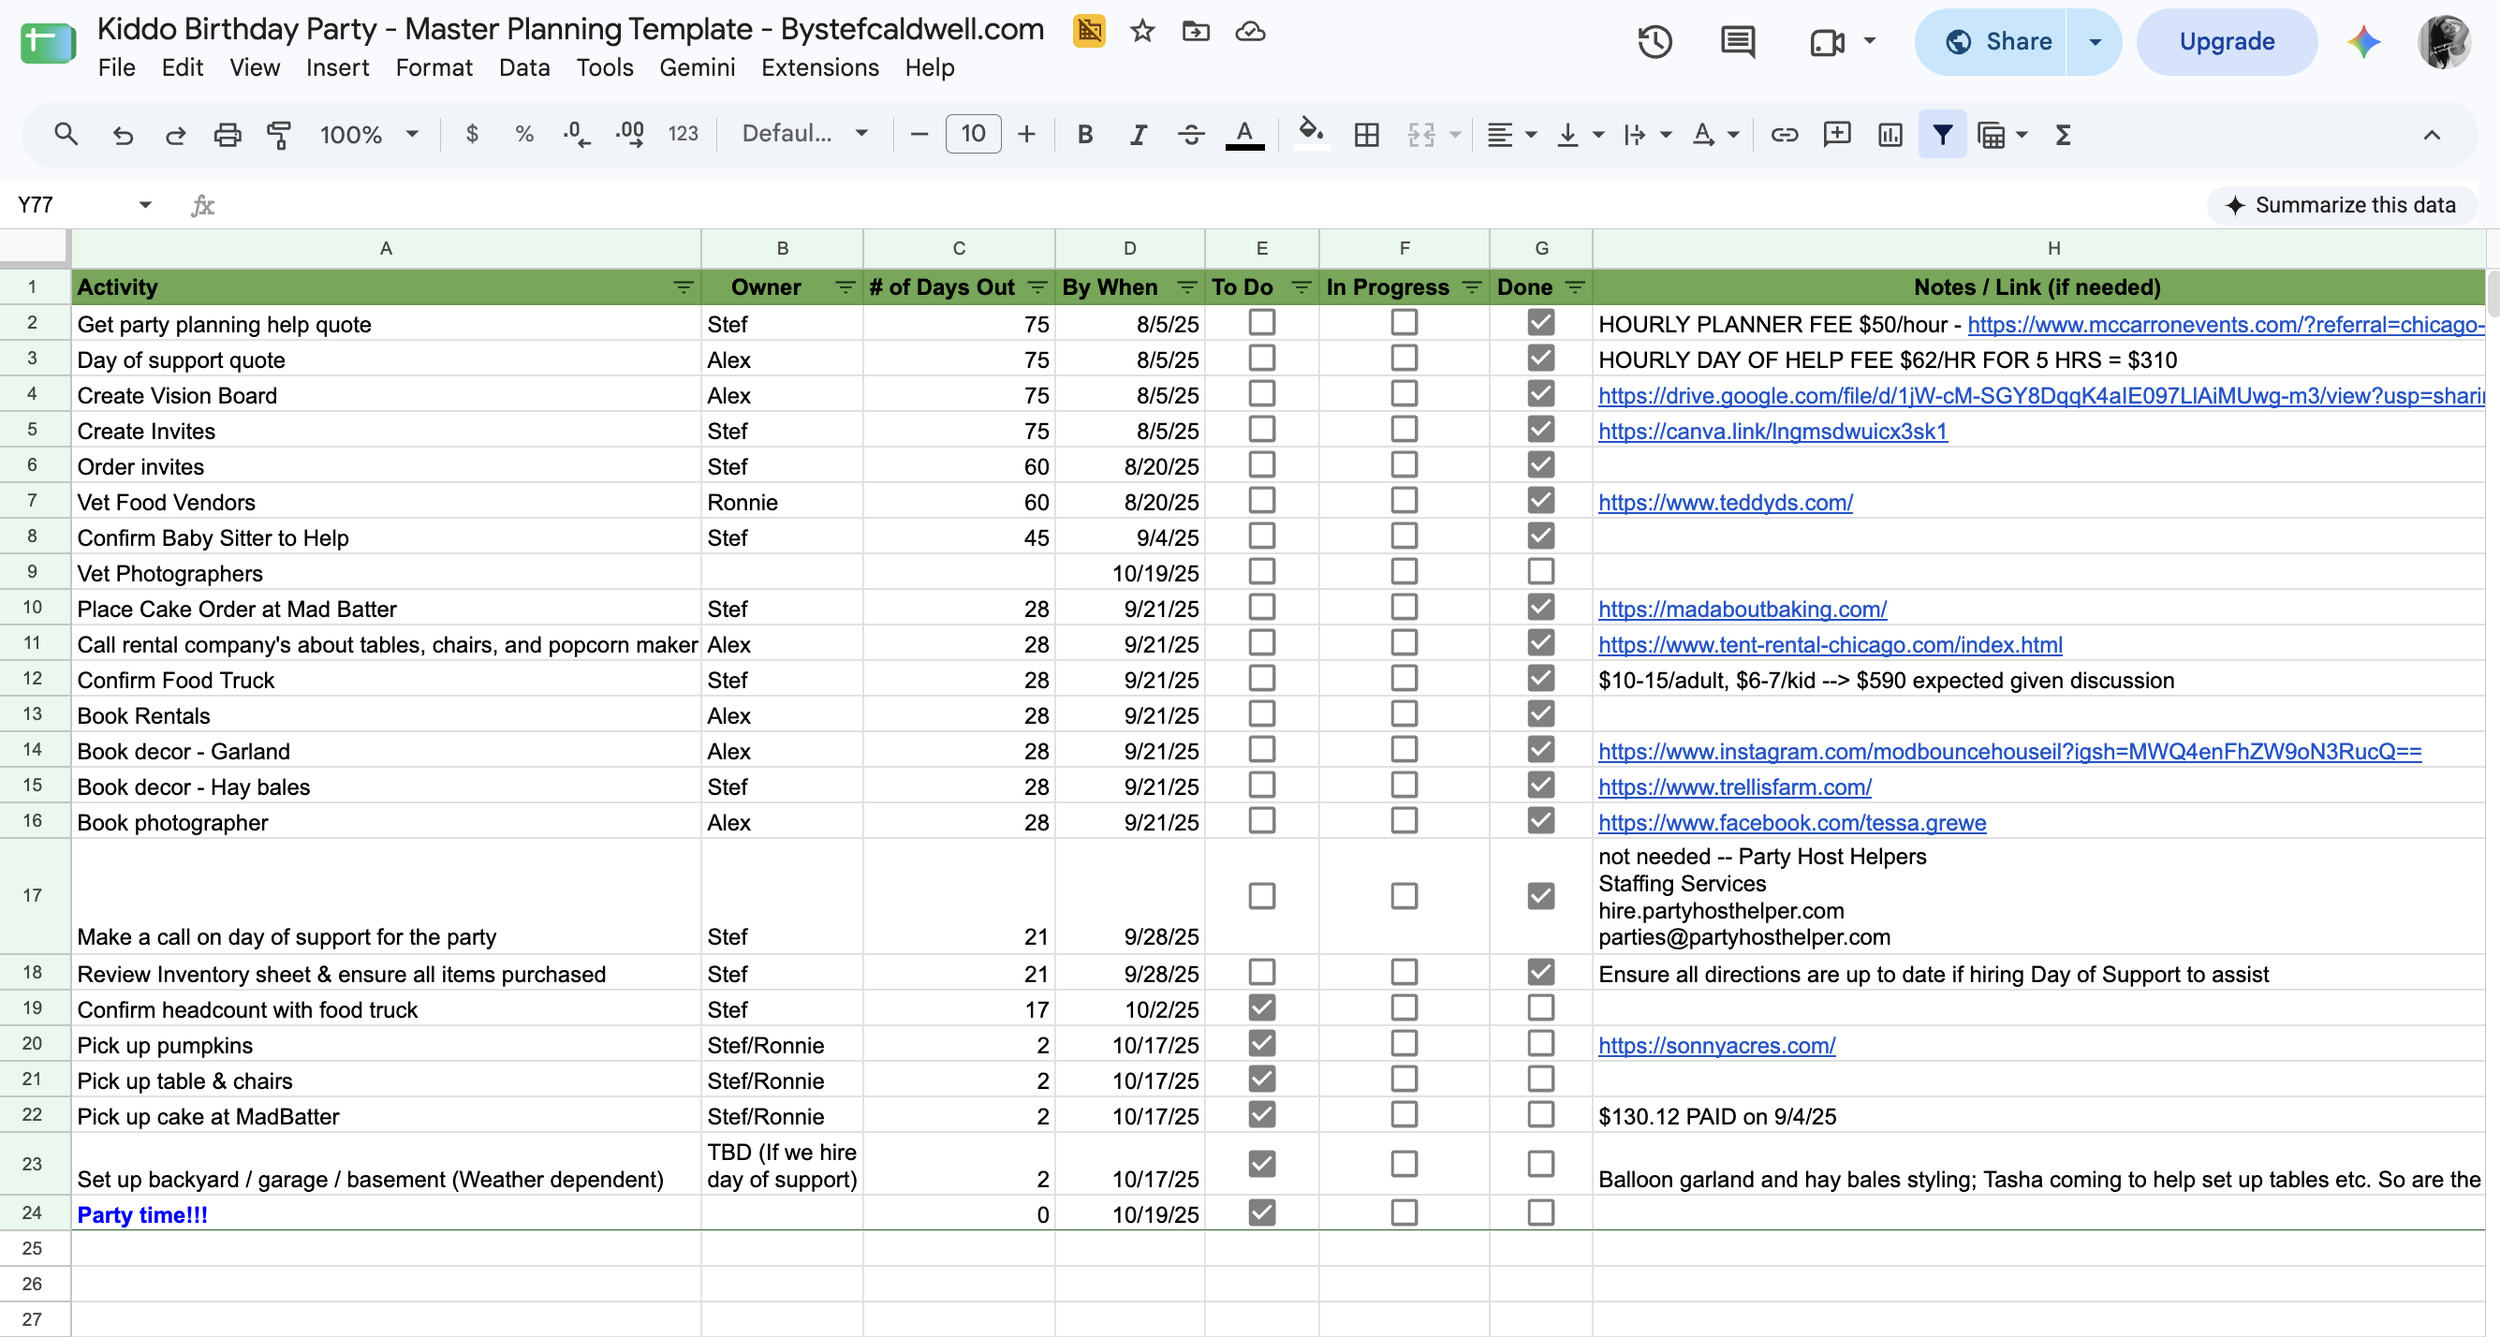
Step Ten: Build One Master To-Do List
With the vision board complete, the agenda established, the invitations out, and the major food and seating decisions made, we built the full to-do list. Ours included:
Send invitations and track RSVPs
Confirm the food vendor and final quantities
Hire a babysitter for party day
Order the cake
Rent or buy tables and chairs
Hire a photographer
Buy mini pumpkins and paint markers
Buy, fill, and hide the ghost eggs
Purchase and set up the graveyard decorations
Order the balloon garland and hay bales
Plan signage, tablecloths, serving pieces, and other decor
Alex turned this into a beautiful tracker that worked backward from party day, assigning a deadline to every task.
This is the part that changes party planning from a swirling cloud of mental load into a project you can actually manage. If every task lives only in your head, everything feels urgent all the time. Once the work is written down and assigned to a date, you only have to focus on what is due next.
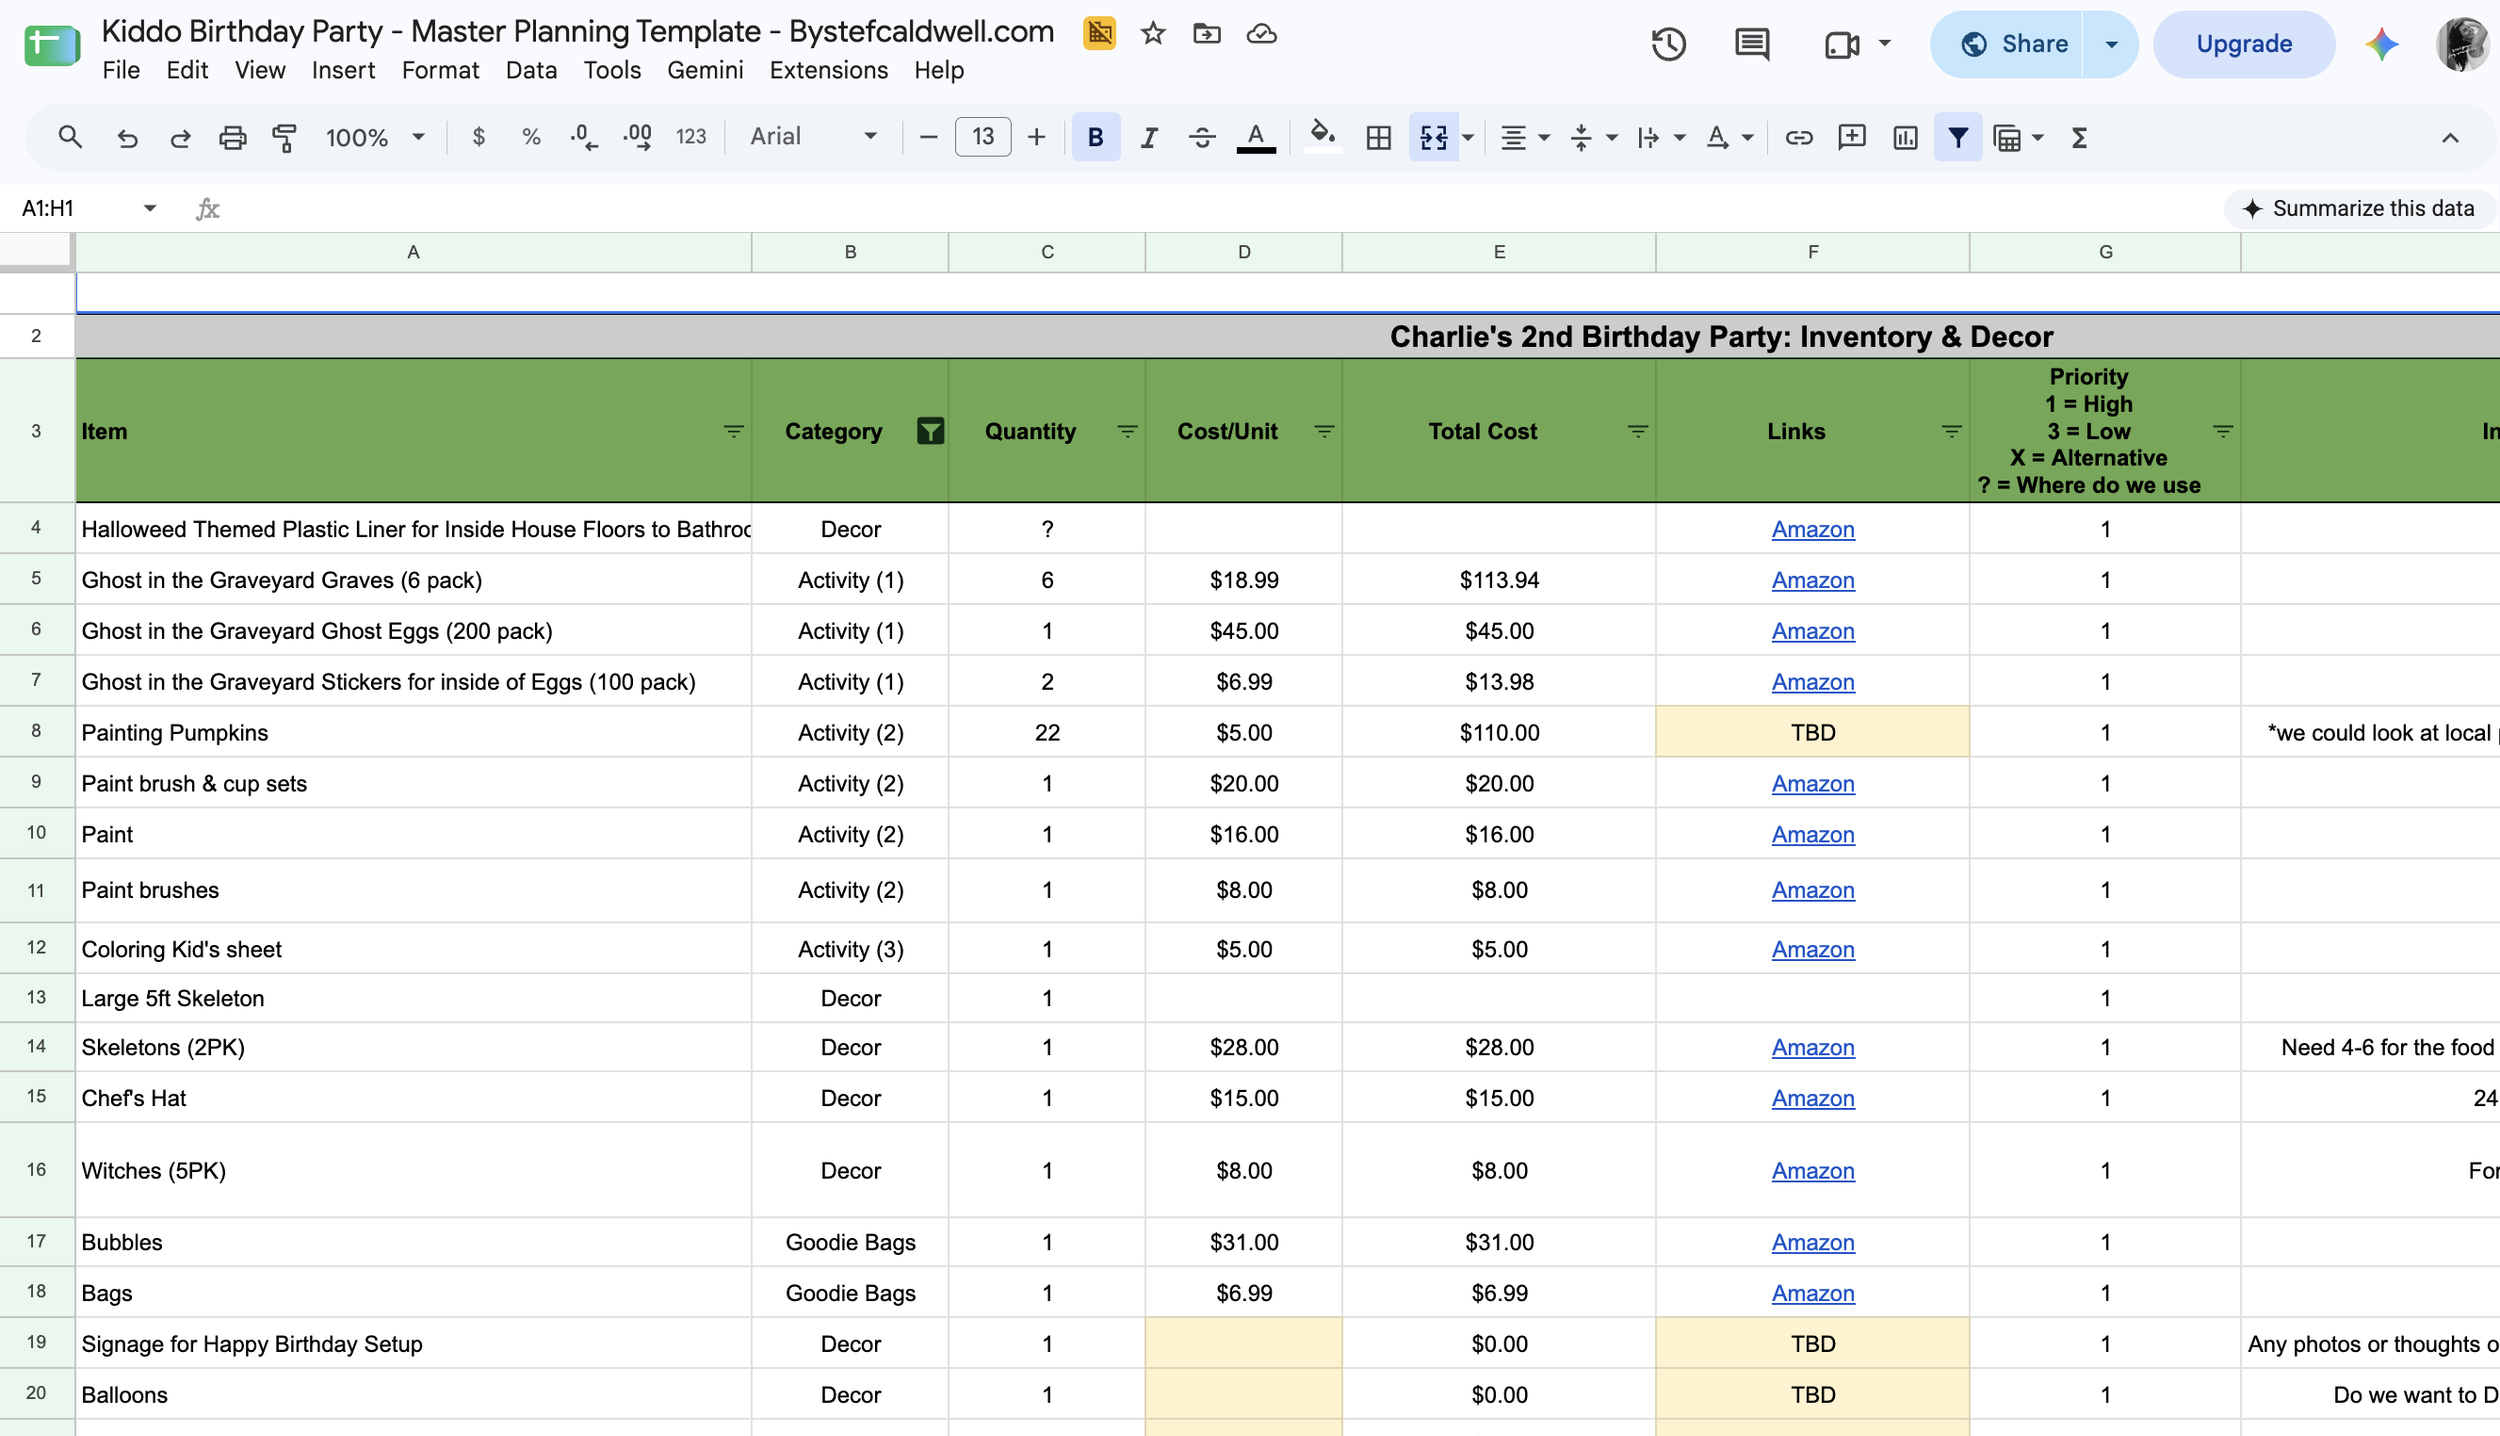
Step Eleven: Create a Prioritized Shopping Inventory
Alex also built a "to buy" inventory with all the things that are incredibly easy to forget: skeletons, witch hats, bubbles, bags, signage, tablecloths, low-height tables, ghost eggs, cake plates, and everything in between. She linked options from Amazon and Etsy that matched the vision-board vibe, and then we stack-ranked each purchase:
Priority 1: Necessary
Priority 2: Helpful or high-impact
Priority 3: Optional
This made budget decisions so much easier. Plates for cake? Necessary. A cutesy "Happy Birthday" sign to place beside a cake that was obviously for a birthday? Totally extra. When every idea feels equally important, party budgets get out of control. Prioritizing the inventory lets you preserve the guest experience while trimming the decorative extras first.

Step Twelve: Hire Help Where It Buys Back Your Presence
I hired a babysitter for the day of the party, and I think some parents might hear that and assume it is extra.
But think about what a dedicated pair of hands made possible. While Ronnie and I hosted, greeted guests, answered questions, coordinated vendors, and connected with friends, someone was specifically responsible for keeping an eye on Charlie and Margaux. It lightened the stress load tremendously, and I will probably do it for every large party we host.
I also hired a photographer. That meant I could be present instead of spending the entire party with a phone in my hand. I did not have to choose between watching Charlie blow out her candles and capturing the moment. I got to experience it, knowing we would still have beautiful photographs of her playing with her friends, hunting for ghosts, and soaking up all that love.
Both were extra expenses. Both bought me something I value deeply: the ability to be inside the memory instead of managing it from the outside.
Step Thirteen: Send Parking Instructions on Party Day
On the morning of the party, I texted all the parents with parking instructions. We have a large driveway, but there is nothing worse than getting parked in at a party when you need to leave. A simple message ensured everyone knew where to park, had a spot, and could leave whenever they needed to. This was such a small thing, but it made arrival smoother and eliminated confusion before it had a chance to begin.
I will do it for every future party. Brilliant.
Step Fourteen: Remember That Party Time Starts Hours Before the Invitation Says
Our party began at 2:00 p.m., which meant getting ready began around 9:00 a.m. We cleaned the house, tidied the garage, set up the tables, planted eggs around the graveyard, arranged the pumpkin activity, accepted the hay-bale and balloon-garland deliveries, and handled a hundred tiny details that had to happen before anyone arrived.
The babysitter was there to help with Charlie and Margaux while we worked. The food truck arrived around 1:30 p.m. Guests began arriving at 2:00.
Because we had already decided what needed to happen, when it needed to happen, and who was responsible for it, party day felt busy without feeling chaotic. And the party went off beautifully. Everyone had a great time. At the end of it, I even got to sit down and share a glass of wine with the friends who stayed late and helped us clean up.
That may be the truest sign of a successful party.
Step Fifteen: Consider Skipping the Opening of Presents During the Party
Okay, presents. Let's talk about presents. We set up a gift table and had everyone leave their presents there. We did not open them during the party.
This is niche advice for a kid’s party, but no one wants to watch a two-year-old open a present, have it pulled from her hands while she kicks and screams so she can open the next present, then repeat that process for every other gift in the pile. It takes forever. The birthday child is miserable. The other children are bored. The parents are wondering how soon they can leave without looking rude.
Instead, we opened presents over the following week, about five gifts at a time.
I filmed a little video thank-you for each person so they could see Charlie's genuine happiness and excitement when she opened their gift, almost as if they had been in the room with us. It also bought me time to write proper handwritten thank-you notes over the following weeks.
Old school, I know. But lovely.
This approach stretched the birthday magic out for Charlie, made gift-opening more enjoyable, and allowed us to thank people in a much more personal way.
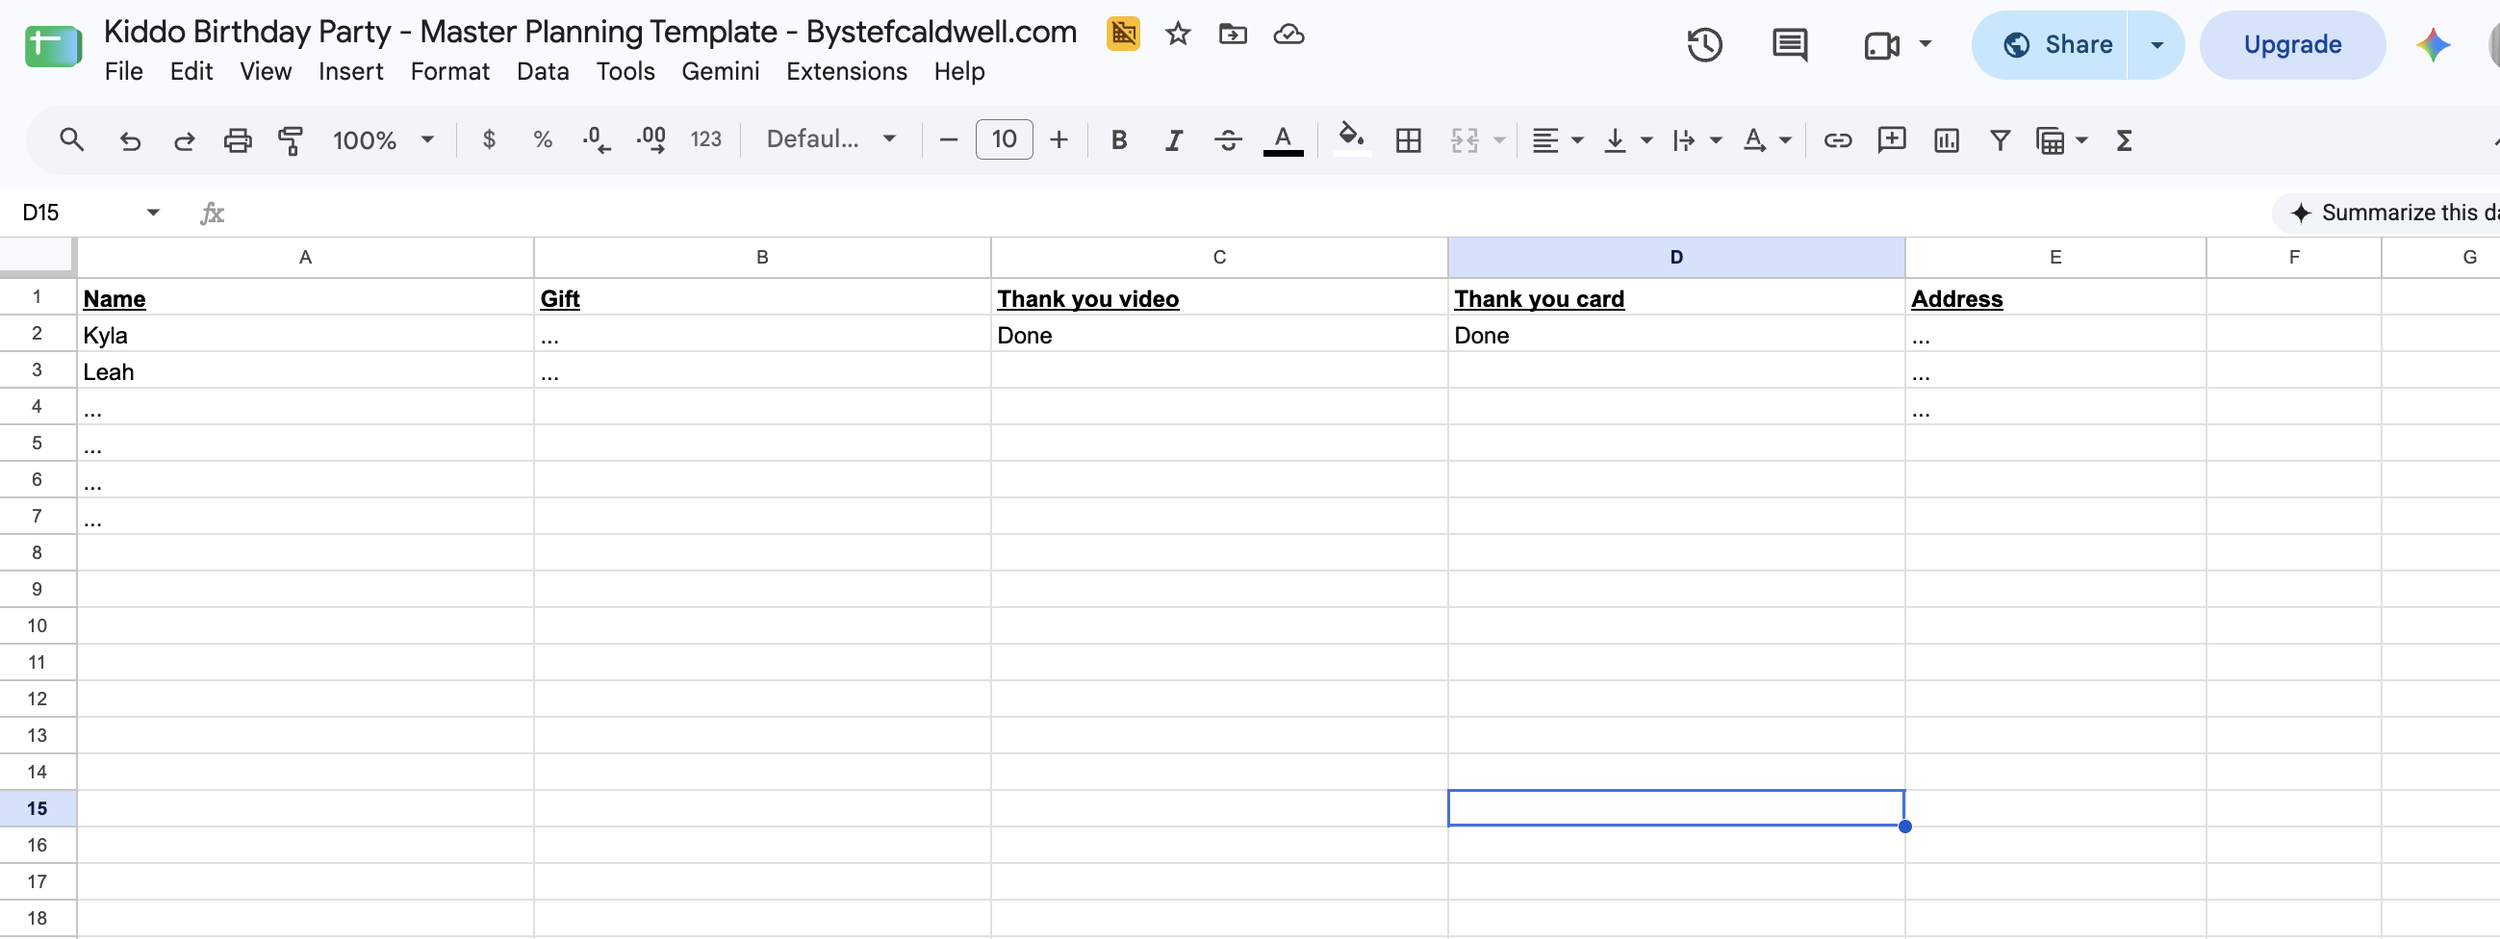
The Party Planning Playbook
If you strip away the ghosts, pumpkins, balloon garlands, and bourbon bacon cheeseburgers, the process is surprisingly simple:
Choose one central concept.
Plan one activity that brings everyone together.
Add a few optional ways for guests to connect.
Build a vision board to align the look and feel.
Map the guest experience in 15-minute increments.
Build the guest list and track adults and children separately.
Decide how guests will eat, sit, arrive, and leave.
Create a master task list that works backward from party day.
Build a prioritized shopping inventory.
Outsource the work that buys back your time, energy, or presence.
Communicate the details your guests need to relax and enjoy themselves.
Create a simple plan for gifts, cleanup, and thank-yous after the party.
A great party is not great because every surface is decorated or because the host personally made every bite of food. It is great because people feel welcomed, considered, and connected. The magic is in the details, yes. But the freedom is in the system.
This playbook helped me take something that felt like a massive feat and break it into tangible component parts. It let me plan like an engineer and live like an artist. And when the day finally arrived, it allowed me to stop managing the party long enough to actually be in it. I hope it does the same for you, Darling. Pull up your seat, make your plan, and then go enjoy your people.
Download the Template
Ready to plan your own gathering without holding every detail in your head? Fill out the form below and you’ll instantly get a link to the playbook that I use to plan every single party, complete with how to organize your vision board, build your guest list, agenda and timeline, budget, inventory, vendors, and what you need to do each day as you countdown to party time.